open table cl: name 'sheerpower:samples\client' input 'Name': name$ set table cl, field last: partial key name$ print cl(id); ' '; cl(last) end Name? D 80561 Derringer |
DESCRIPTION:
-
This statement retrieves the first record matching the partial key in str_expr.
FORMAT:
-
SET TABLE table_name: ID str_expr
EXAMPLE:
| Example 15-48 SET TABLE: ID |
|---|
  declare table str
  open table cl: name 'sheerpower:samples\client'
  ask table cl: id cl_id$
  set table str: id cl_id$
  extract table str
  end extract
  for each str
    print str(#1); ' '; str(#2)
  next str
  end


20000 Smith
20001 Jones
20002 Kent
23422 Johnson
32001 Waters
43223 Errant
80542 Brock
80543 Cass
80544 Porter
80561 Derringer
80573 Farmer
|
DESCRIPTION:
-
SET TABLE: ID sets a table to a table ID that has been stored previously into a string variable with the ASK TABLE: ID statement. Once the SET TABLE: ID statement has been used, the table with the new table name (STR in the example) can be accessed. By using these statements, generalized routines can be written when the table that will be accessed until runtime is not known.
FORMAT:
-
SET TABLE table_name: POINTER num_expr
EXAMPLE:
| Example 15-49 SET TABLE: POINTER |
|---|
open table cl: name 'sheerpower:samples\client' extract table cl end extract set table cl: pointer 3 print cl(id); ' ' ; cl(last) end 23422 Johnson |
DESCRIPTION:
-
This statement sets the table to the nth record extracted. The statement is useful after an extract has been done because it provides random access to any record extracted. There is no error message if there are no records extracted, or if the number given is out of range. If the number is valid, _EXTRACTED is set to 1; otherwise, it is set to 0.
FORMAT:
-
SET TABLE table_name: EXTRACTED 0
EXAMPLE:
| Example 15-50 SET TABLE: EXTRACTED 0 |
|---|
open table vend: name 'sheerpower:samples\vendor' set table vend: extracted 0 end |
DESCRIPTION:
-
Setting the number of records extracted to zero causes a new collection to be started. The SET TABLE table_name : EXTRACTED 0 statement is used in conjunction with the EXTRACT TABLE table_name: APPEND statement.
-
Below is an example of opening an existing table, extracting a record from it and updating the information in the record.
| Example 15-51 Updating a Table Record |
|---|
// Simple customer query
open table cust: name 'sheerpower:\samples\customer', access outin
do
  line input 'Customer number', default '12513': cust$
  if _exit or _back or cust$ = '' then exit do // get out if nothing to do
  set table cust, field custnbr: key cust$  // do the search
  if _extracted = 0 then
    message error: 'Cannot find '; cust$
    repeat do
  end if
  print cust(custnbr), cust(name)
  line input 'New name', default cust(name): newname$
  if _exit or _back then repeat do
  if newname$ = cust(name) then repeat do // nothing to do
  cust(name) = newname$  // update the name
  print 'Name changed to: '; cust(name)
loop
end
|
Chapter 16
Database Setup
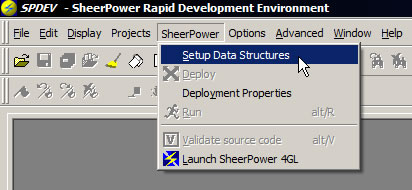
16.1 SETUP--Overview
-
Sheerpower works with data in any database engine. The SETUP process in SPDEV tells Sheerpower where data files are located and what database engines are used. Tables (structures) and definitions are the description of the data layout and it's characteristics. Once the tables have been defined with SETUP, Sheerpower's table statements can be used to manipulate the data.
Note
In Sheerpower, the words "structure" and "table" are synonymous.SETUP supports the following database engines:
ARS
FASTFILE
| Example 16-1 Entering SETUP |
|---|
|
|
-
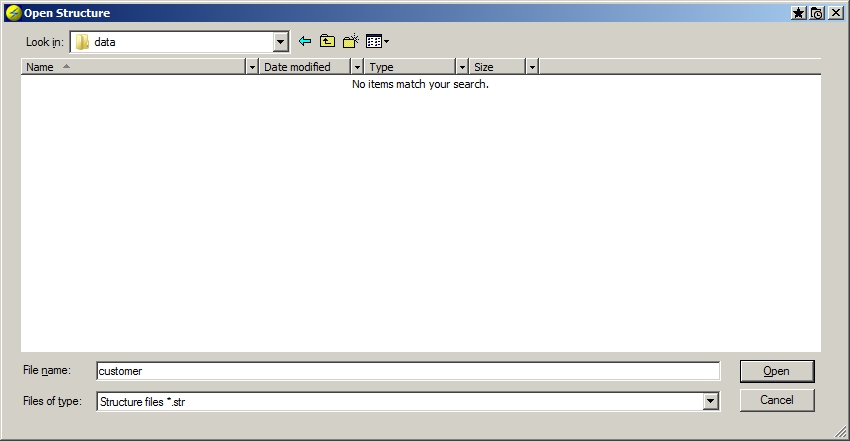
The OPEN STRUCTURE dialog box will open. If this is an existing table, select the folder where it is stored, then select the file name.
If you are creating a new table, choose the folder where it is to be stored and type in the file name.
Click on [Open] to open the selected existing table or create the new table.
| Example 16-2 Open Table/Structure |
|---|
|
|
-
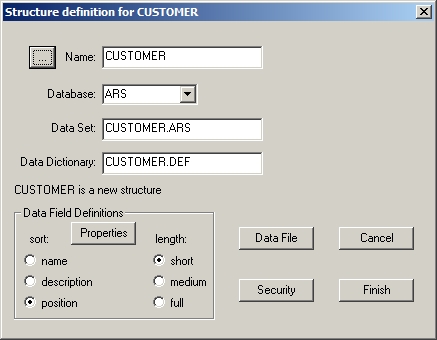
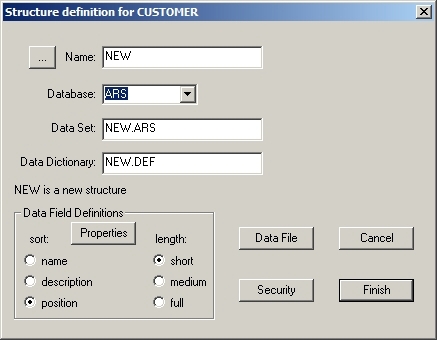
Once the table has been opened, the STRUCTURE DEFINITION window will be displayed.
| Example 16-3 Structure (Table) Definition Window |
|---|
|
|
16.2 SETUP Table Definitions
-
This section describes the SETUP table definition fields and options. Data fields inside the table can be defined or modified. Field definitions can also be displayed in multiple formats.
Default answers are provided for many of the table definition fields. You may either accept the default answer, or type in different information.
-
The NAME of the table will default to be the same name as the file that you opened or created. The default extension for the file is .STR. The table file contains:
- the name of the database engine (record management system)
- the name of the data set (data file)
- the name of the data dictionary
The table name can be any Windows file specification.
Clicking on the [...] button to the left of the table NAME field will reopen the Open Structure dialog box. This allows you to select a different table to open.
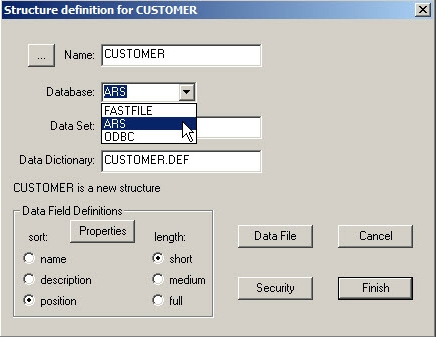
16.2.2 Database Engine
-
Click on the down arrow beside the DATABASE field to select the DATABASE ENGINE used by this table.
| Example 16-4 Selecting Database Engine |
|---|
|
|
-
If this is a new table, the default database engine will be ARS.
When modifying an existing data table, the default will be the database engine specified in the table file when it was originally setup.
16.2.3 Data Set
-
Inside the DATA SET field, type in the name of the DATA SET that will be used with this table. If this is a new table, the default data set name will be the same as the table name. The default extension is .ARS.
| Example 16-5 Data Set |
|---|
|
|
-
The same data set can be used for a number of tables. For instance, you might use the CUSTOMER data set for both a CUSTOMER and a SALES table:
             table files      data set

             CUSTOMER.STR         |
                         \        |
                          \       v
                           \
                            CUSTOMER.ARS
                           /
                          /
                         /
                SALES.STR
This can be useful when there are multiple uses for a set of data, but the access and definitions required should be different for each table.
The data set name can be any Windows file specification.
| Previous | Next | Contents | Index |